
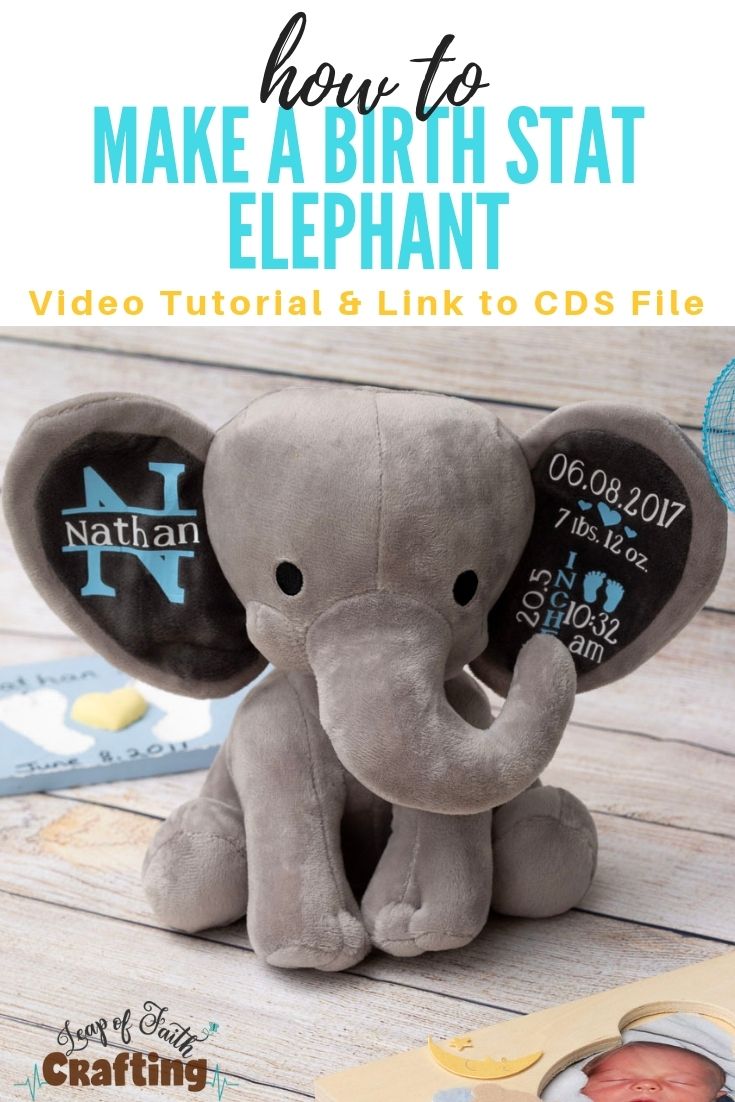
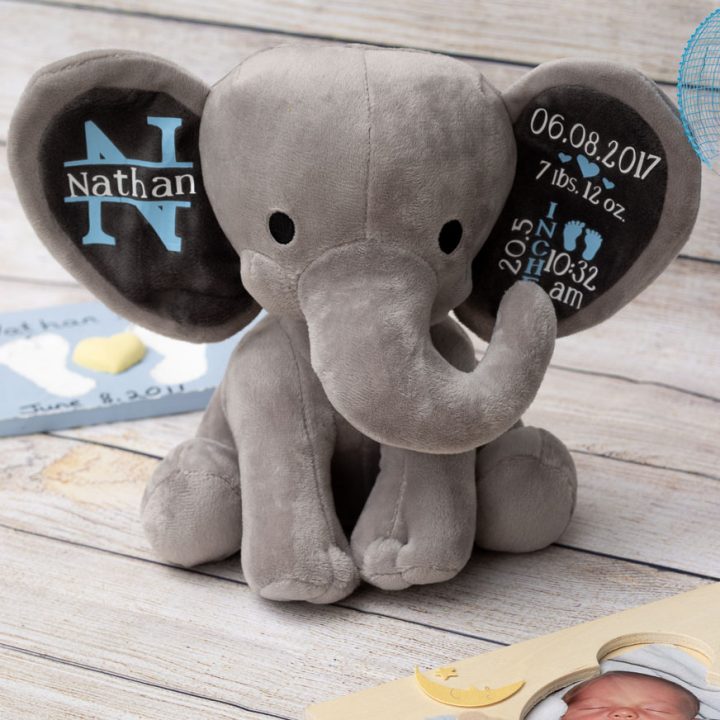
Giving DIY baby gifts mean so much to the recipient and this birth stat elephant baby gift is one of the cutest!
Personalized newborn baby gifts are so cute, don’t you think? Personalized keepsakes don’t get any more adorable than one for a new baby in your life.
They don’t have to be difficult either. With a Cricut cutting machine and some iron-on vinyl, you can make this birth stat elephant for any baby to love on and parents to swoon over!
But beware, you might want to have another baby just so you can make one for yourself…ha ha!

Materials Needed for DIY Baby Gifts
Disclosure: This post contains affiliate links from Amazon and/or Cricut.com. I receive a small commission at no cost to you when you make a purchase using my links (purple text).
- elephant – I got this super cute one off Amazon or a pink elephant here
- Iron-on Vinyl
- Cricut cutting machine– always check prices between Cricut.com and Amazon (click links to compare!)
- Cricut mat and tools
- EasyPress 2 or EasyPress Mini
- EasyPress mat
You can always check out my Amazon storefront to see all the Cricut items I love! If you want to know all that a Cricut can do make sure to browse my Ultimate Resource to Cricut Ideas or find out which Cricut is right for you.
Birth Stats Elephant Tutorial
I have printable instructions and a full video tutorial on applying the iron-on to the ears so make sure to turn on the volume and watch it below (or at the top of the post!)
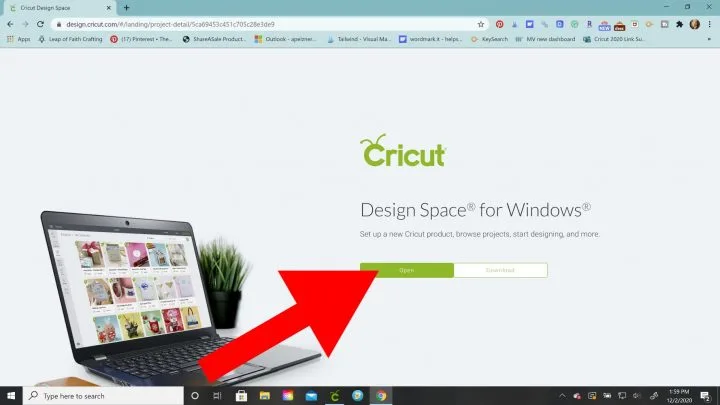
You can easily design the elephant birth stats in Cricut Design Space yourself, but if you have Cricut Access and want to use my template click here.
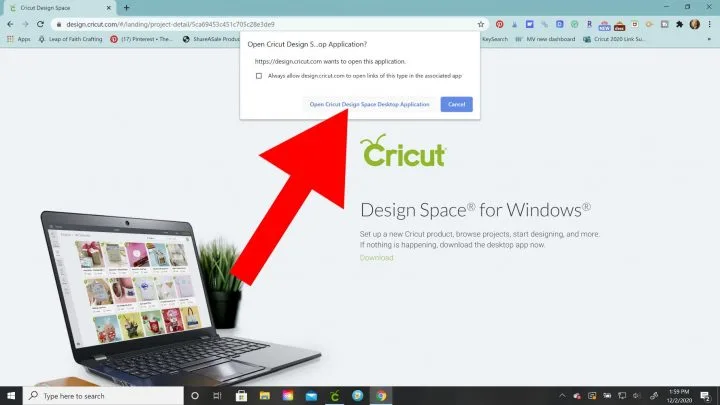
Sometimes CDS might open and tell you to download, but you should just be able to click on Open.


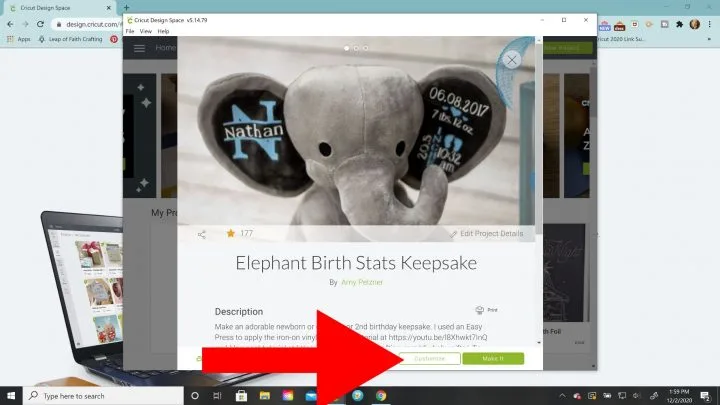
Then this should pop up. Click on customize to open up the Cricut birth stats template.

You probably have to do some detaching and ungrouping to get to the point where you can edit the template!
Also, if you are new to CDS, make sure to check out my series of Cricut Design Space 101 tutorials to get started.
I have a full set of free split letter script monograms you can use or I also have a video tutorial on how to design a split letter monogram in CDS you can watch.
I actually traced the ear of the elephant and uploaded it to CDS so I could size it. I ended up making the monogrammed name about 2.3″x2.3″ and the birth stats 2.5″ across by 3.5″ tall.

Cut the images out of iron-on vinyl. Make sure to turn on the mirror setting in the preview screen and place the HTV on your mat with the shiny side down. Cut it on the iron-on setting.
I did not attach all of mine because I wanted to be able to manually place them.


Weed off the extra vinyl and cut the plastic backing so you have separate pieces of the birth stats.


Using an EasyPress 2 to Apply Iron-on
Since the elephant is polyester, I set the temperature on the small EasyPress to 315F. If you need more help on how to use an EasyPress, make sure to check out my Cricut EasyPress 2 review.
This would also be the perfect project for an EasyPress Mini (I didn’t have one yet when I made this birth stat elephant keepsake!)
Once the EasyPress is preheated (it only take a minute or so!), press the ear for a few seconds to get the moisture out.
Apply the largest sections of text to the ear where you want them.


Since I will be pressing twice (kind of like layering), I will be pressing them on a little bit differently.
Press the first layer with two hands on the EasyPress and a lot of body weight for about 3 seconds.
Wait 30 seconds for the iron-on to cool and then peel off the backing.


Place the other pieces of the birth stats where you want them making sure the plastic backings don’t overlap.
Place a Teflon or protective sheet off the whole ear and press lightly for 20-25 seconds.

Remove the plastic backing. Flip the elephant over and press the back of the ear for 15 seconds. Pressing the back side really helps the HTV adhere even more.

Repeat the same steps for the other year. Press for a few seconds then center the monogram letter.


Press with two hands and a lot of body pressure for 3-5 seconds. Let cool for 30 and then remove the plastic backing. Center the name.
Cover with a protective sheet and press for 20-25 seconds. Remove plastic, flip over elephant and press the other side for 15 seconds.

Flip him over and ooooh and awww over how cute he is! You probably can tell from these adorable Cricut favor boxes with elephants on them, that I just think baby elephants are the cutest!
He would go perfect with an engraved birth stat plaque if you have a Cricut Maker or a paper flower shadow box with the baby’s name on it.
If you are going to a gender reveal party, you could gift just the stuffed elephant with a little gift card for you to personalize it after the baby is born!
Newborn Keepsake Birth Stat Elephant Video Tutorial
Click here to watch my full tutorial on making this birth stat elephant on my YT channel.


Another great gift idea is a DIY block cute nightlight with my free SVG cut file or a cute personalized minky blanket!


Make sure to check out my list of personalized gifts to make for family members with a Cricut.
If you’d like to save this tutorial for later, hover over the top left of the image below and PIN It now.

Here are the printable directions!

DIY Baby Gifts: How to Make an Adorable Birth Stat Elephant
Make cute personalized newborn baby gifts that they will love! Learn how to easily make a birth stat elephant.
Materials
- Elephant
- HTV/Iron-on vinyl
Instructions
- Design the birth stats or use my file in CDS. See post for link.
- Cut out of iron-on vinyl on mirror setting. Weed off extra vinyl. Cut into sections.
- Set EasyPress to 315F. Press the ear for 3 seconds.
- Center large sections of vinyl on ear. Press with two hands and a lot of body weight for 3-5 seconds.
- Let iron-on cool for 30 seconds. Remove plastic backing.
- Place other pieces of birth stats on ear. Cover entire ear with protective sheet and press lightly for 20-25 seconds.
- Remove plastic backing. Flip over the elephant and press the backside of the ear for 15 seconds.
- Repeat the same steps for the other ear. Pressing the split monogram first.
- Enjoy your adorable keepsake!
Notes
See post for step by step picture and videl tutorial. Link to CDS file in post also.
Recommended Products
As an Amazon Associate and member of other affiliate programs, I earn from qualifying purchases.

Thanks so much for stopping by and have a creative day!


")
")


wendy
Wednesday 9th of November 2022
I cant find this in design space. What do you search under.
Leap of Faith Crafting
Thursday 10th of November 2022
You should be able to open the file within Cricut Design Space when you click on the link. https://design.cricut.com/#/landing/project-detail/5ca69453c451c705c28e3de9
Lisa
Wednesday 24th of November 2021
Since the elephant is Polyester, can I sublimate on it. This Elle is so cute!
Leap of Faith Crafting
Saturday 4th of December 2021
I haven't tried, but probably! Since it's a darker grey the sublimation might just be muted.
Natalie
Wednesday 2nd of December 2020
It won't let me open the link in my cricut design space :(
Leap of Faith Crafting
Wednesday 9th of December 2020
I did update the post and the link so hopefully it opens now! I think there was an update in CDS and some of the previous links went wonky!
Lori
Monday 25th of May 2020
Hello, does this work out ok with just an iron if I don't have an easy press?
Leap of Faith Crafting
Tuesday 9th of June 2020
Yes, you can always use an iron! Just follow the instructions from your iron-on on the settings.
Eliza Bedell
Sunday 19th of April 2020
Thank you so much for your tutorial and for sharing your layout! I was able to edit the birth facts easily. I then watched your tutorial on how to make a split monogram and was able to do that as well. I'm so excited with the results and can't wait to give it to the recipient. I've got two nieces having babies soon so I'll be making more of these adorable keepsakes. Thanks again for sharing your information with us!
Leap of Faith Crafting
Sunday 26th of April 2020
HI Eliza, yay! I'm so glad they were helpful for you. I"m sure your nieces will love them!