
Add an extra glitter image to your glitter yeti cup by using double sided adhesive sheets and a cutting machine. Check out a video tutorial on how to do it! contains affiliate links. See Policies tab.
Hi Friends! Are you ready for another DIY glitter Yeti cup / Ozark Tumbler/ RTIC mug tutorial?? There are so many great stainless steel mugs on the market and there are also so many great ways to decorate them!
I have a new way to show you that adds even more glitter to your cup and it’s not by using glitter vinyl. Enter double-sided adhesive sheets!
Have you used them yet? You can convert almost any image to make one and then use whatever color glitter you want.
Did I mention they are sooo much cheaper than glitter vinyl??? Win win!!

Disclosure: This post contains affiliate links from Shareasale, Cricut, Awin, CreativeFabrica, and Amazon.com. I receive a small commission at no cost to you when you make a purchase using my links (purple text). As an Amazon Associate, I earn from qualifying purchases.
To watch a video on how I paint the mug click here. Then to glitter, and epoxy the mug, follow my tutorial here!
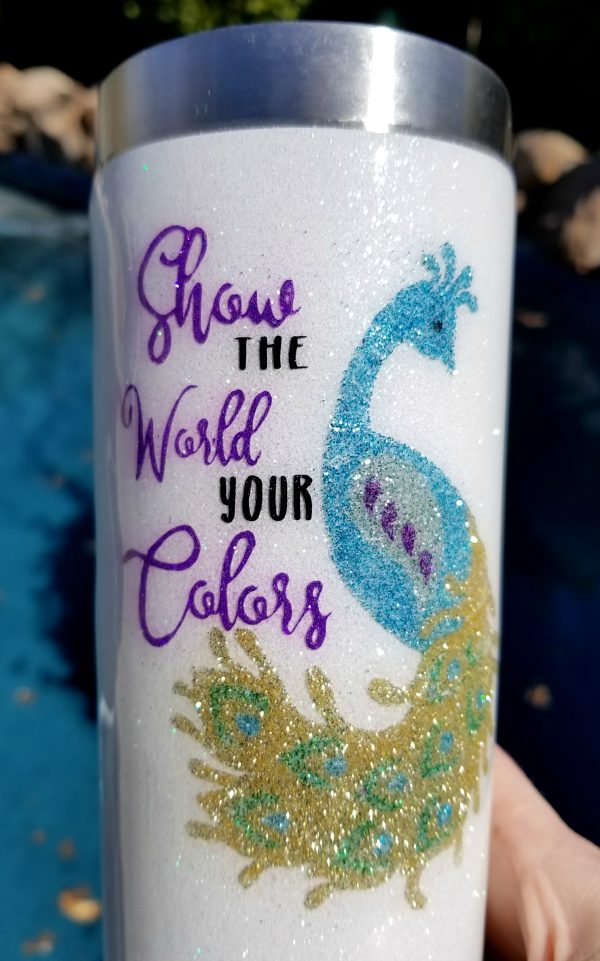
For this glitter tumbler, I spray painted the base coat with Rustoleum white gloss protective enamel (found on amazon here) and crystal extra fine glitter.
Using Double-Sided Adhesive Sheets
I have three different videos below so make sure to watch all of them to see the process in action!
The star of this glittered yeti is the double-sided adhesive sheets! I use the Darice brand found on Amazon here.
Silly Winks is another brand sold at Hobby Lobby but they always seemed to be sold out so I used the Darice brand and they worked perfectly!
You can always browse my Amazon storefront with my complete DIY Tumbler supply list.
For your image, you’ll want to create an outline for it so that it will cut out in two different parts. Once one part is cut out (inside or outside depending on your image), you’ll need to pause your Cricut and change the cut dial.
Here’s a quick video on how to create the image in Cricut Design Space using one of their files.
Cutting Silly Winks with a Cricut
When you send the image to cut, one of two things will happen. It will either cut the outline out first or it will cut out all the insides.
Cut out the image on a spare piece of cardstock first to see which happens. You need to know because you will need to change the dial setting in between the two.
For my machine, the outline cuts out best on light cardstock setting and the inside details cut best on paper setting.
I tested the cut on cardstock first and for the peacock, the outline cut first. Place the double-sided adhesive with the blue side facing down on your mat.
I set my dial to Light Cardstock first. Once the outline was cut and the machine paused, I pushed the pause button on my Cricut.
Then I turned the dial down to Paper setting and hit cut. Then it cut out all the inside details.
Here is a video of my Cricut cutting out a different image I used for another cup, but I wanted to give you the idea on how to do it.
Once it’s cut, you’ll want to glitter each section separately as I did with my flamingo sign and unicorn acrylic cup
Here is a video of how to glitter the image after it’s cut.
Once the glitter image is all done, you can apply a layer of mod podge or gloss spray and let it dry. Peel off the back blue paper and apply it to the mug.
The hinge method works great here (click here for tutorial!).
Once everything is applied ( I cut out glitter vinyl for the words), apply another layer of epoxy and it’s done!
Watch a full video tutorial on applying epoxy to glitter tumblers if you need help on this part.
I love how mine came out.


On the other side of the glitter yeti cup, I put a picture of my kiddos using water slide paper. This stuff is amazing and so easy and cheap to use!! Check out my full tutorial here on how to decorate a tumbler using your own pictures and mod podge!
If you’d rather apply a monogram like this picture, click here to go to download a FREE split letter monogram PNG alphabet!

If you’d like to see my ultimate resource guide for personalizing tumblers click here!


So many ways to decorate a glitter yeti cup or mossy oak tumbler, right? I love the double-sided adhesive sheets when using a Cricut machine!
If you’d like to check out my ultimate guide of Cricut ideas click here!

You can never have too much glitter, right?? Thanks so much for stopping by! Have a great day!


Katie
Thursday 21st of March 2019
Hi! How do you wash the cups without messing up the glitter or image??
Leap of Faith Crafting
Saturday 23rd of March 2019
Hi Katie, you need to add a layer of epoxy in between the glitter and decals and then again on top of the decal. You can see a full video tutorial on how to epoxy on these posts: https://www.leapoffaithcrafting.com/glitter-tumblers/ or https://www.leapoffaithcrafting.com/glitter-tumbler-diy/