
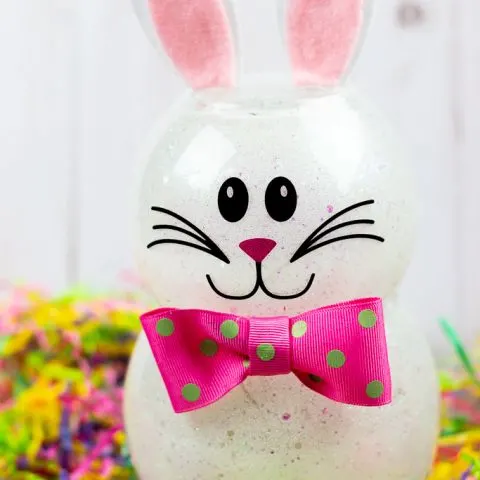
Learn how to make a bunny that lights up out of dollar store supplies and glitter. This fish bowl Easter bunny is fun and cheap to make!
Glitter, bunnies, Easter, and lights… some of my favorite things! And combining them all together to make a super cute Easter decoration is easy and fun.
With Easter coming up fast, I needed some new Easter decorations to go with my DIY Easter signs, wooden cross Easter decoration, bunny wood sign, and painted Easter baskets.
Some of my most popular tutorials are how to make a light-up DIY snowman and The Grinch decoration with Dollar Tree fish bowls, so I figured why not make a cute fish bowl Easter bunny the same way. He turned out pretty cute if I do say so myself!


This would be a fun project to make with your kids and they could use it as a nightlight and not just at Easter time. If they are a fan of bunnies, you could really have this out year-round.
I used my Cricut to cut out vinyl for the face, but you could easily use some paint markers to draw on the face. If you have a Cricut, I have a free bunny face cut file below.
Supplies Needed for Fish Bowl Easter Bunny
Disclosure: This post contains affiliate links from Amazon and/or DollarTree.com. I receive a small commission at no cost to you when you make a purchase using my links (purple text).
- glass bowls – I bought both of these at the Dollar Tree. They are slightly different sizes and can be found in the candle aisle.
- mod podge and paintbrush
- white glitter
- hot glue gun
- felt for ears
- Cricut and adhesive vinyl (optional) or paint markers
- Ribbon
- fairy lights
How to Make a Bunny Directions
I made a video tutorial at the top or side and printable directions at the bottom on how to make this glitter bunny so make to watch it if you are more of a visual learner.
I also have a link to the full video tutorial on my YouTube channel below.
The first thing you’ll do is paint a coat of mod podge inside the glass bowl.


Dump in some glitter and rotate the bowl around until the inside is fully covered. As you’re rotating, make sure to have a paper or container below you to capture the spare glitter.
I used a combination of the white glitter plus a mixture I had left from the glitter snowman. It had a little bit of pink glitter and large white glitter in it.


That’s why it’s so important to save your glitter even if it’s mixed. You can always use it again in another project.
Do this for both bowls and let them fully dry for 24 hours.
If you are using an electronic cutting machine, cut out the bunny face SVG from below and weed off the extra vinyl.


Clean off the front of the top bowl with rubbing alcohol. Transfer the face to the glass with transfer tape and scrape down well. Remove the tape.


If using fairy lights, put half of a strand in the top bowl and the other half in the bottom leaving the battery pack out the back.


Put some hot glue between the glass bowls to secure them together.


Cut some bunny ears out of felt. I used my Cricut to cut them out but you can easily do it with some scissors.
Glue the smaller pink piece onto the white piece. Glue the ears to the top of the bowl.


Make a little bowtie for your cute Easter bunny.
I folded a ribbon into a circle and glued the end pieces together. Then I folded another piece of ribbon and wrapped it around the middle of the circling bow. (Make sure to watch the video, much easier to explain why you’re watching it!)


Then glue the bowtie on where the bowls meet and he’s all done!


Enjoy your new Easter decoration during the day and night!
If you’d like to watch my full detailed tutorial you can watch it on YouTube here.


FREE Bunny Face SVG File
As a reminder, all of my FREE SVG files are for personal use only and not for commercial use. Please click here to purchase a commercial license if you want to use the files for commercial purposes such as to sell items for your small business.
Sometimes the file will look blurry when you first open it, but once you download it, the SVG will open up clearly.
If it doesn’t automatically download, you might need to right-click on it and Save As. If you need additional help, make sure to check out my post on how to download and upload files to CDS.
Or check out my Cricut Design Space 101 series for even more tutorials.
Click Here to Download BUNNY FACE SVG here


If you’d like to save this tutorial for later, hover over the top left of the image below and PIN IT now.

And here are the printable directions on how to make a bunny from Dollar Store supplies!

How to Make a Bunny Out of Glitter and Dollar Store Supplies!
Learn how to make a bunny out of glitter and some dollar store supplies. Add some lights to make a cute Easter night light!
Materials
- 2 glass bowls from Dollar Tree
- white glitter
- mod podge
- felt for ears
- adhesive vinyl or paint markers
- ribbon
- fairy lights
Tools
- hot glue gun
- Cricut
Instructions
- Coat the inside of the glass bowl with Mod Podge. Dump some glitter in and rotate around and around so that the glitter covers the entire inside. Dump the extra glitter back into your container.
- Repeat same process with second glass bowl. Let dry for 24 hours.
- Clean the front of the top bowl with rubbing alcohol.
- Download cut file, cut out of adhesive vinyl, and transfer to the glass bowl. Or draw a bunny face onto the top glass bowl with paint markers.
- Optional - if you'd like the cute Easter bunny to light up, place a strand of fairy lights inside (half of strand in top bowl and half in the bottom). Leave the battery pack sticking out of the back side.
- Add some hot glue to the rim and secure the bowls together.
- Cut out bunny ears out of felt or cardstock. You can find some templates on google or use a Cricut to cut them out. Cut out two white ears and two smaller pink pieces.
- Glue the pink piece onto the white piece and then hot glue them on to the top of the glass bowl.
- Make a bow out of ribbon and hot glue it on where the bowls meet.
- Enjoy your new cute DIY Easter decoration!
Notes
You can find the FREE bunny face SVG file on my post. Make sure to watch the full video tutorial for more detailed instructions!
If you have any questions on how to make a bunny, please let me know!
Thanks so much for stopping by and have a creative day!


Theresa
Saturday 29th of February 2020
When printing the face of the bunny out it is not coming out all together. Is there a way I can get the eyes, whiskers and month to print the way it needs to go on the fish bowl?
Leap of Faith Crafting
Thursday 5th of March 2020
Hi Theresa, You mean when you're cutting? If you want it all together, make sure they are all "attached". Sometimes they don't carry over that way. Click on each black piece and then hold down your shift or control key and click on the other black pieces. Once there is a square around all of them, click Attach. That should keep everything as is when you go to cut it!
Karrie
Wednesday 19th of February 2020
For the bunny face do you just leave it the size it is in Design Space?
Leap of Faith Crafting
Saturday 22nd of February 2020
Hi Karrie, I had to go back in and check! I sized it to 3.8 inches wide (which was about 1.75 inches high).
Cindy Hawkins
Monday 3rd of February 2020
Did you use the stiff felt or the thin felt? My ears keep flopping forward and not wanting to stand up. Thanks!
Leap of Faith Crafting
Thursday 6th of February 2020
Oh no! My felt wasn't too stiff, like the sheets or anything, but it doesn't flop. I guess some felts can be super flimsy. You can always use a brush and paint some mod podge on the felt and let them dry to make it stiffer.
Caitlin
Tuesday 14th of January 2020
What color fairy lights did you use-warm white or cool white?
Leap of Faith Crafting
Tuesday 14th of January 2020
They seem more like a cool white!
MckMom
Friday 10th of January 2020
Where is the video tutorial link? I cannot find it.
Leap of Faith Crafting
Tuesday 14th of January 2020
Thanks so much for asking! I have no idea how the video got removed. I added it back on so it should autoplay near the top or on the side as you scroll. Have a great day!