
Learn how to make a tumbler turner for cheap with just a few supplies.
HI Friends!! So, after a year of hand turning my DIY glitter epoxy tumblers, I finally decided to bite the bullet and build my own DIY cup turner! Now I’m wondering, why did I wait so long???
It was pretty easy and cheap to throw together and now I don’t have to sit by my personalized tumblers for hours watching and turning. Are you ready? Let me show you how to make a tumbler turner for under $25.
The price could actually be cheaper if you have some of these supplies around your house or if you get creative! If you’ve been following me for a while, you know I have a ton of scrap wood that I am always trying to use up. This was a perfect project for it!

I grabbed a leftover scrap of a 2×6 and 2×4 from my huge DIY farmhouse table build (click here to check it out!) I’m sure you could scrounge some up or ask a friend for some small pieces.
If you’d like to check out my ultimate guide on how to make a bunch of different personalized tumblers, click here! For my step by step and video tutorial on how I apply epoxy to make a DIY glitter tumbler, click on the link.
Materials Needed for DIY Tumbler Turner

Disclosure: This post contains affiliate links from Amazon. I receive a small commission at no cost to you when you make a purchase using my links.
****It seems like some PVC pipes are slightly different depending on the thickness of the walls. Make sure to measure the outside diameter of your PVC pipe and use a drill bit that is slightly bigger. Use corresponding adapters.****
- wood – I used a 2×6 that was 13 inches long and 2 2×4 pieces that are 6.5 inches long
- motor – This is one I bought from Amazon
- lamp cord with switch – I got mine from Amazon here
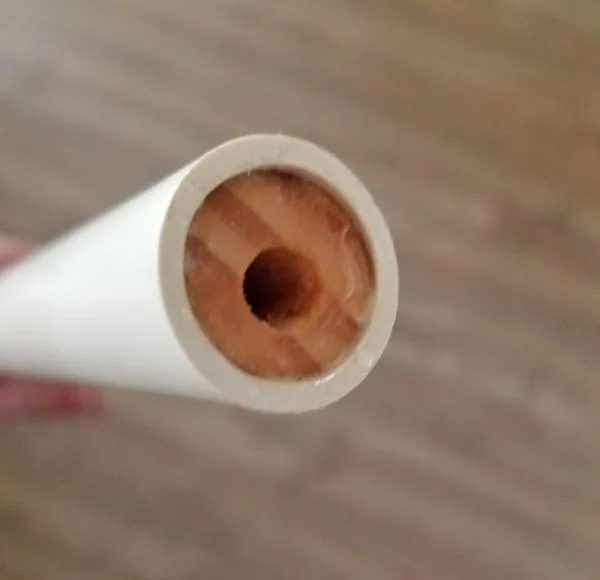
- 1/2″ or 3/4″ PVC pipe, male and female adapters. My rod measured 3/4″ on the outside and 0.69 on the inside.
- Pool Noodle – I got mine from Walmart
- Gorilla Glue
- screw-on wire connectors
- wood rod – I had a 3/4″ diameter rod from a wooden laundry rack that I used but you can find rods at craft or home stores.
- Drill and 1-inch drill bit or slightly bigger if using a 3/4 inch pipe ( I love my Ryobi cordless drill found here!)
How to Make a Tumbler Turner Tutorial (Single Cup Turner)
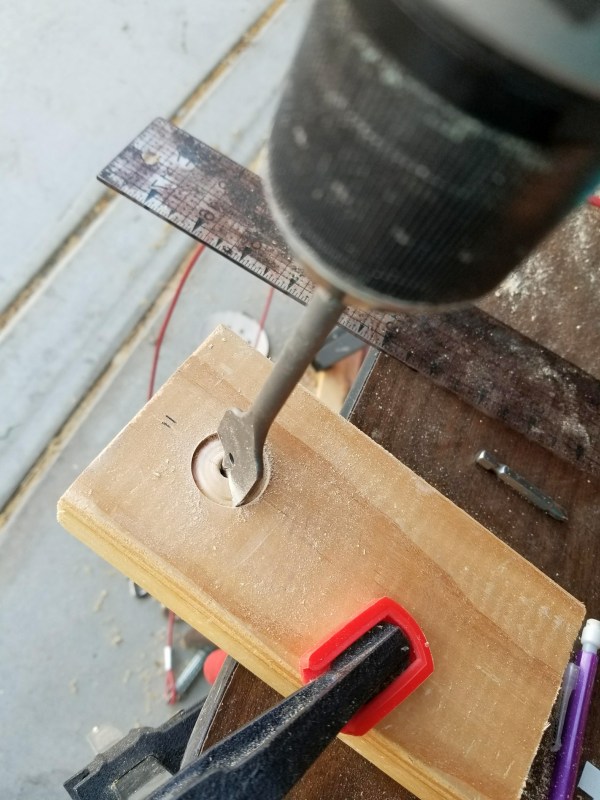
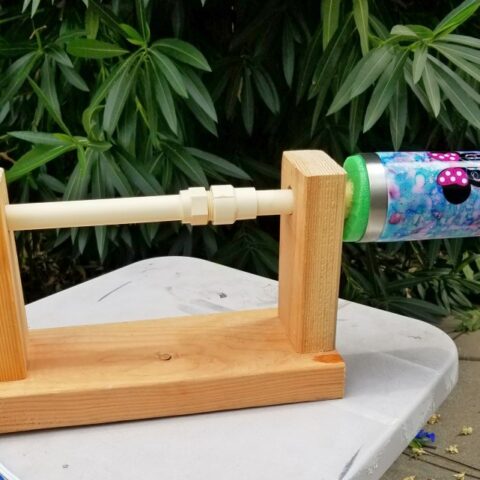
The first thing you’ll want to do is drill 1-inch holes into your 2x4s. I put the center of the hole about 1.5 inches from the top. Clamp the wood to a side of the table.
Drilling a 1-inch hole through a 2×4 takes a while! Wear some safety goggles and do it in a well-ventilated area.


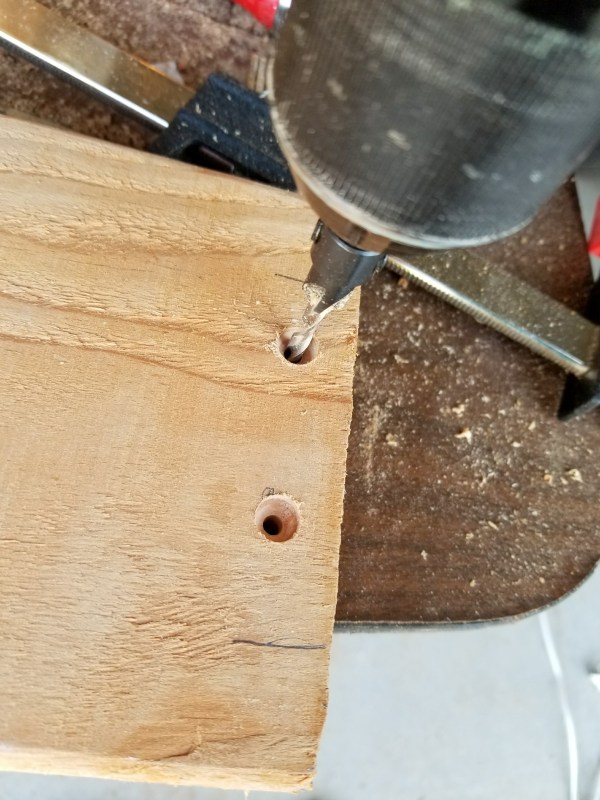
Once the first board was done, I clamped both boards together (perfectly aligned!) and started drilling my second hole. This way I knew they’d be the same height.


Once I drilled through a bit, I unclamped them and just did the one board now that I had a starter hole.
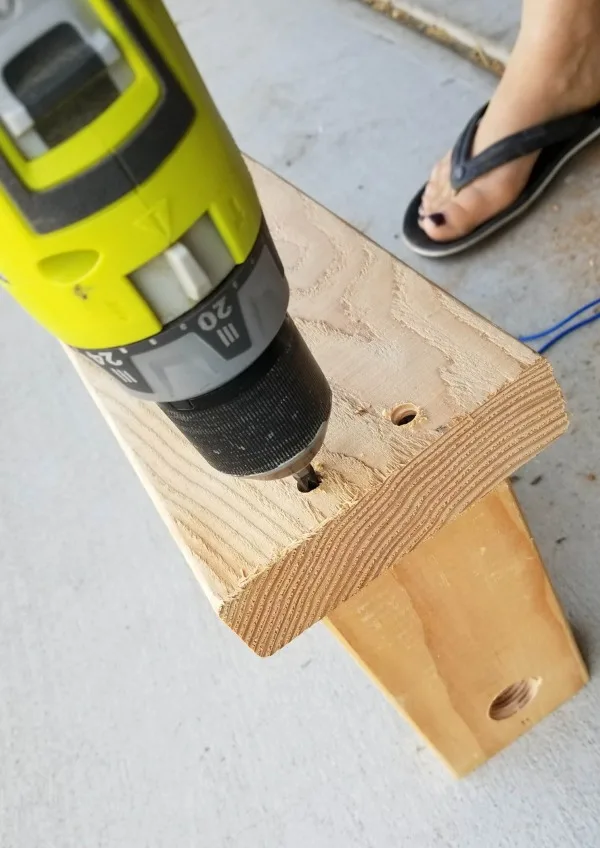
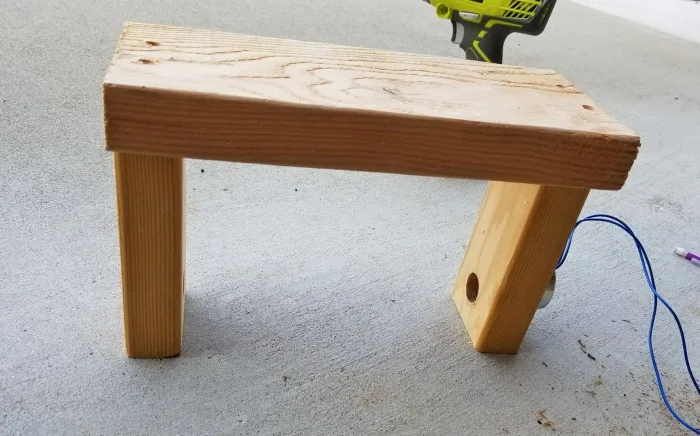
Then you’ll just need to attach the pieces together. You want some distance between the two so that it adds stability. I put mine at the ends of my 13-inch piece of wood.
I first drilled pilot holes with my countersink drill bit so that the screws wouldn’t stick out and make the bottom uneven.

I found it easiest to place the 2x4s on the ground and then drill the 2×6 on top. Make sure the 2x4s have the holes closest to the ground! I used 3-inch screws.


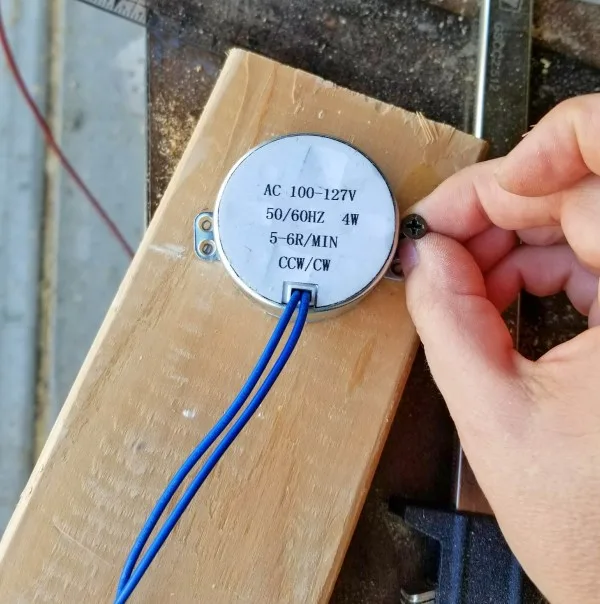
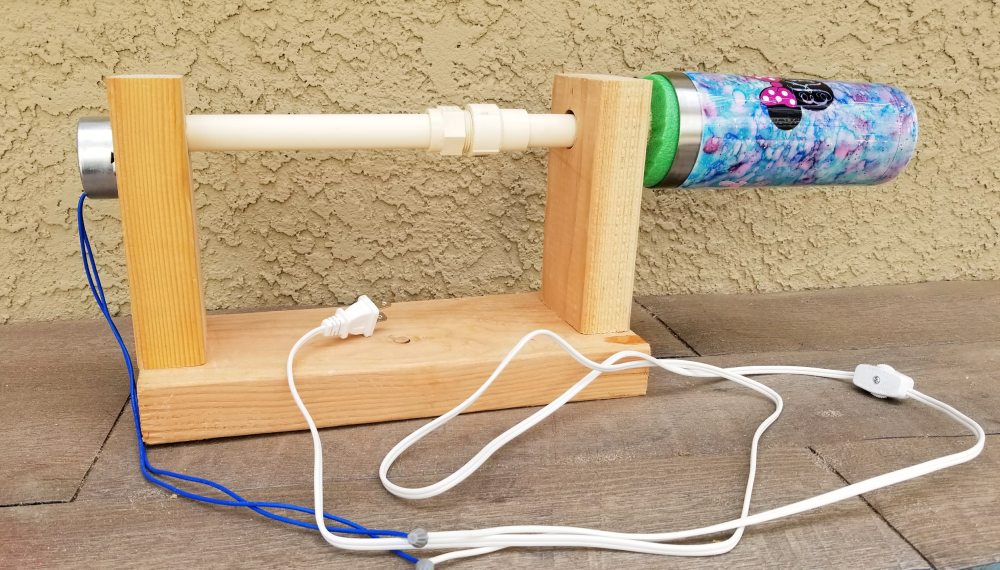
Now, onto the motor of the single cup turner! Make sure you are doing all this BEFORE you plug anything in!!
Putting the DIY Glitter Tumbler Turner Together
You’ll need to twist the pigtail ends of the motor to the lamp cord. (If you have a lamp cord you are not using, by all means, use one you already have, save $$!!)
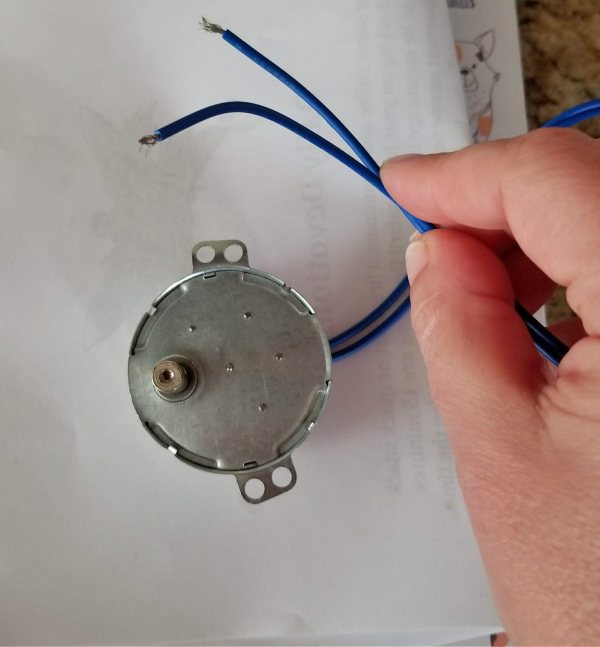
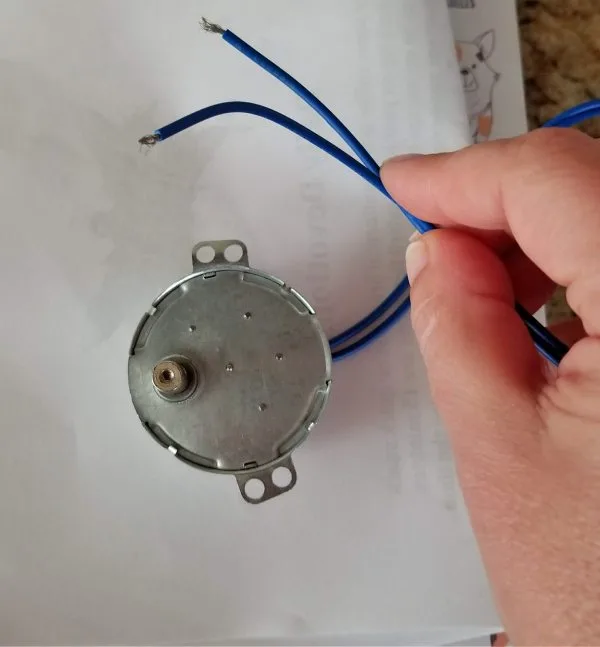
Once they are twisted together, attach the screw-on connectors. Now, plug it in and see if it works. If the motor doesn’t turn, you might need to switch the wire connections. Make sure to UNPLUG it and then switch the wires, attach the screw ends, and then see if it works.


Cut the long PVC pipe in half. You will attach a noodle to one side and the motor to the other. The side I connected to the motor was 8 inches long.

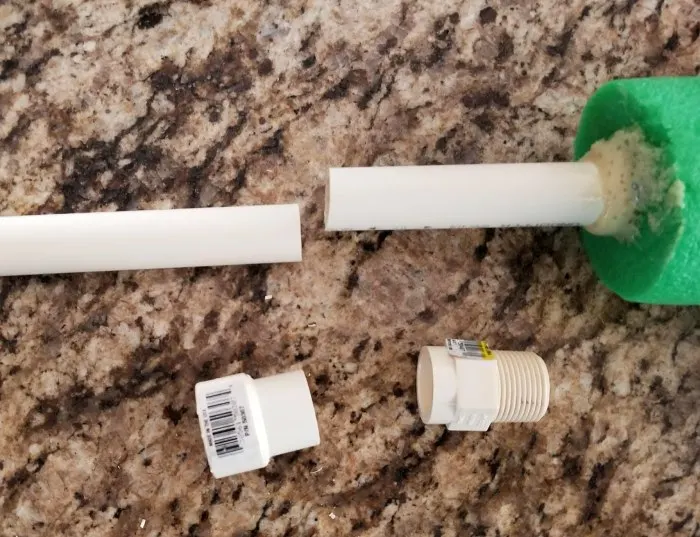
They will connect back together with male and female adapters.


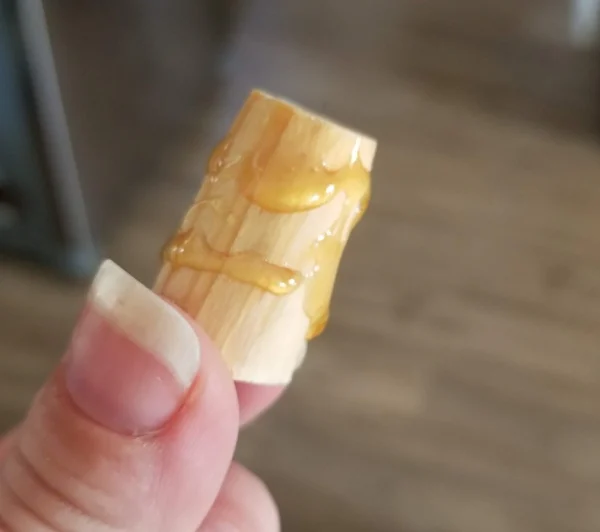
Cut a small piece of a pool noodle with a serrated knife (not the Dollar Store noodles, but the thicker ones from Walmart. They fit more snug in the tumblers).
(I have made two PVC ends, one with a pool noodle and one with a foam football for smaller tumblers. The pipes are 9-11 inches long.)

Then you’re going to get one end of a PVC pipe a little wet and apply the gorilla glue all around it. The gorilla glue expands when it dries so it really adheres it!! I got this idea from Mr. Coop on YouTube. You can watch his video on how to do this part here.
Let it dry. Once it’s hard, you can scrape off the extra if you want.


I’d love if you come craft with me on Instagram! Click below to follow. Also, if you make any of my crafts I’d love to see them!! Tag me @leapoffaithcrafting.
Attaching The Motor to DIY Cup Turner
Now, use the other half of the PVC pipe. Attaching the motor to the PVC pipe was the hardest part for me! The first time I did it, it only spun for a few seconds and then kept stopping. They weren’t secure enough together.
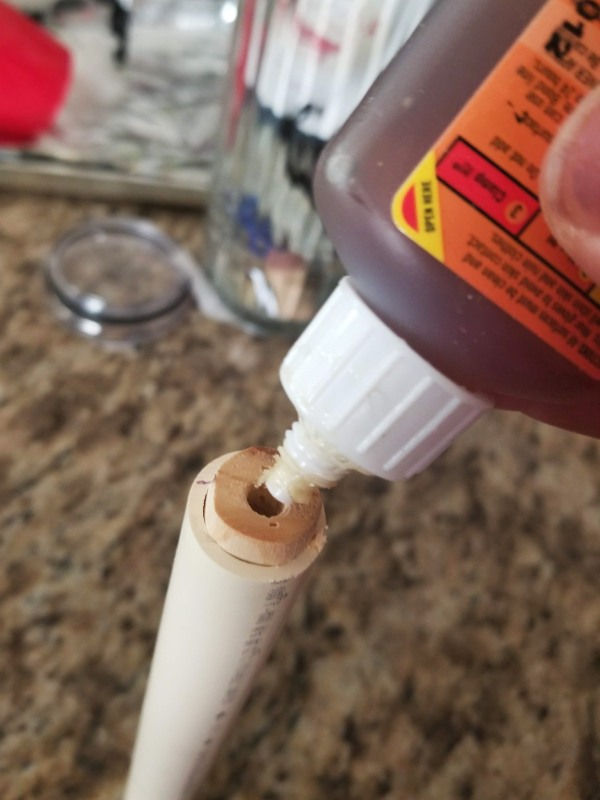
At first, I was trying to get a cork to fit in the hole or something else that would sit securely in. I saw this other video from Mr. Coop (watch here) , so I decided to try it. I had an old 3/4″ rod lying around so I drilled a hole in it.
I started off with a smaller drill bit size and worked my way up. 15/64 inch drill bit ended up being what worked for me. It wouldn’t go in easily so I had to use a mallet, but it’s secure.
The first time I made the hole, I went with a 1/4 inch drill bit and it fit easily (which meant not tight enough!). I tried to use the gorilla glue to secure it together but it didn’t work, so I had to start over!
After I drilled the hole with the 15/64 inch drill bit, I sanded down my rod so that it would securely fit in the PVC pipe. I stuck the small wood dowel on the other end of a drill bit and used 80 grit sandpaper to sand it while I rotated it around. You could also use an orbital sander, but mine was broken:(
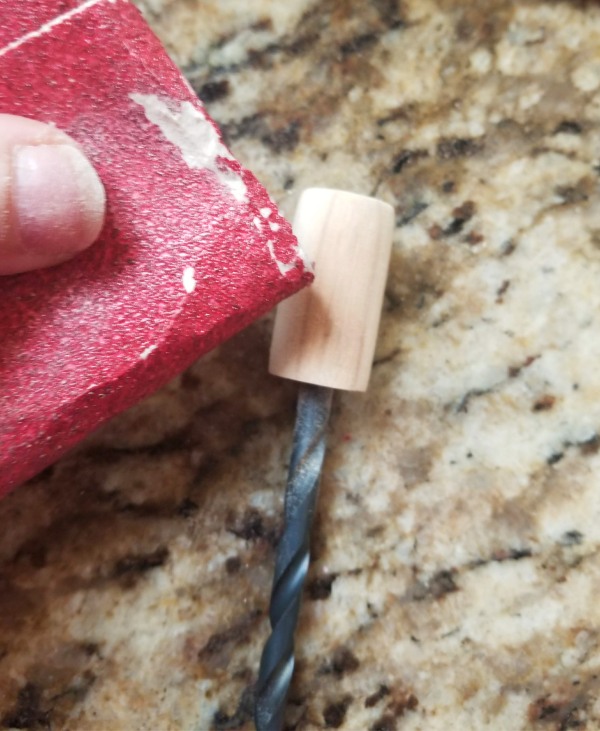
Once I got it just small enough to fit in, I hammered it in with a mallet. If you end up getting it a little too small, you can add some gorilla glue on the wood piece, stick it in the PVC pipe and let it harden.


I put a little bit of the gorilla glue in the opening and squished the motor prong into it (by taking a mallet to it!) The motor is never coming off the PVC pipe now!

Make sure that it works! Plug in the cord and turn it on. You should see the PVC pipe rotating.
Now you can stick the PVC pipe with the motor attached to it through the holes. Attach it to the outside of a 2×4 with screws.


Here is a tumbler I made using alcohol inks and the DIY cup turner. Find out how to make your own custom tumbler with watercolor effect here or how to hydro dip a tumbler here.
That’s it! You should be good to go! I made a short video to show you the setup of this single cup turner since that’s sometimes easier for some (should be playing here or at the top or on side of the screen make sure to turn on the volume!)!
Here are some printable directions!

How to Make a Tumbler Turner for Cheap!!
Learn how to make a motorized tumbler turner out of a PVC pipe, wood, and a motor. A single cup turner is a must-have if you make a lot of tumblers with epoxy.
Materials
- Wood - 2x4 and 2x6
- 3/4 " PVC Pipe and connectors
- Motor
- Cord with plug
- Pool Noodle or Foam Football
- Screws
- Gorilla Glue
Tools
- Drill
- 1 inch drill bit
- Sandpaper or sander
Instructions
- Cut the wood. I used 2 6.5 inch long 2x4s and a 13 inch long 2x6.
- Drill 1 inch holes into the 2x4s about 1.5 inch from the top.
- Attach the 2x4s to the 2x6 with countersunk holes and 3 inch screws.
- Attach the pigtail ends of the motor to the lamp cord (before it's plugged in!!) Screw on wire connectors.
- Cut a PVC pipe. I used a 8 inch piece to connect to the motor. Attach male and female connectors.
- Attach a 3-4 inch piece of a pool noodle or foam football to the end of a 9 inch PVC pipe with gorilla glue and let it dry (get the PVC pipe a little wet so the glue foams).
- Drill a hole in a wooden rod that fits very snug with the motor. I ended up using a 15/64 inch drill bit.
- Sand the wooden rod down until it just fits into the PVC pipe. It should be very snug. I added a little glue on the outside of the dowel and hammered it in.
- Attach the PVC pipe to the motor and slide the PVC pipe through one of the 2x4s. Screw in the motor to the outside of one of 2x4s.
- Push the other PVC pipe with the foam noodle into the male and female connectors and you're done!

Notes
Make sure to read the full step by step with pictures single cup turner tutorial on my blog post. Also, watch the video of how everything is connected on the tumbler turner at the end!
Thanks so much for stopping by! If you have any questions, please let me know!
If you’d like to save this cup turner tutorial for later, you can PIN the picture below!

Have a creative day!


Mikki TerBush
Wednesday 16th of October 2019
Is that the big moter? We have the one from Michael's. And it won't hold the big mugs? More than 20 oz. TIA. Mikki
Leap of Faith Crafting
Monday 21st of October 2019
It's the one I linked off Amazon. I couldn't find a motor at the craft stores! I know they are starting to sell a turner at stores but from what I'm heard they only hold the 20 oz cups and tip over pretty easily.
Allison
Saturday 24th of August 2019
Thank you so much for the tutorial! I’ve been wanting to make these for a while now and am finally getting around to it! Initially i ran into the same problems others have been having and i think I’ve figured out some of the issues. You say you used 3/4” PVC pipe, is it labeled 3/4 inch pipe or does the outside diameter of the pipe measure 3/4”? What i have found is that 1/2” PVC pipe has an outer diameter of 3/4” and would absolutely be able to fit into a hole made from a 1” drill bit, whereas 3/4” PVC pipe has an outer diameter of 1.05” (as mentioned previously) and will require a larger drill bit to make a hole large enough for the PVC pipe to fit. Also, when using the 3/4” PVC pipe, the 3/4” wooden dowel is too small to fit tightly into the PVC, it rotates freely, whereas if the PVC pipe were 1/2” the 3/4” wooden dowel would have to be sanded down and hammered into the pipe in order for it to fit and it would be a snug fit. Just trying to shed some light and maybe fix issues others are having as well as myself? Luckily, i happened to have 1/2” and 3/4” PVC pipe lying around the house but i had already purchased everything else mentioned in your tutorial for the 3/4” PVC pipe, we learned quickly that we would have to use our witts to come up with something that we could make work. We finally were able to get everything together and working, i was just wondering about the size of your PVC pipe and if it is possible that it’s 1/2” instead of 3/4”? Thanks!
Krista Farnum
Saturday 5th of September 2020
Does the motor on yours get warm?? Or is that normal??
Phil Ellerbrock
Saturday 26th of October 2019
I see you have the threaded connectors inside of the tumbler. How does this come out to swap to a different rod holding say the football rather than the noodle? If it doesn’t come out, why out the cut and extra parts in there?
Leap of Faith Crafting
Tuesday 3rd of September 2019
Hi Allison, thanks for the info. I just used a pipe I had and I've used it so much now that the markings are worn off. The adapters I use that fit snugly are marked 3/4 inch adapters so I'm not sure! I looked some things up and it looks like it depends on the inside wall thickness too. I'm not sure if brands or age of pipe makes a difference. I'll update with the variations though! Thanks!
Stacy
Saturday 17th of August 2019
My 3/4” PVC pipe doesn’t fit in the 1 inch hole. I measured the hole and it’s exactly 1 inch. The PVC pipe diameter is ever so slightly larger. Is this a glitch? I’ll go back to the hardware store and measure other pipes. I’m wondering if I could use 1/2” PVC since I already cut the 2x4 and drilled the 1” holes. Any advice would be helpful.
Leap of Faith Crafting
Sunday 18th of August 2019
Oh no! That's weird! Do you have a bigger drill bit to make the hole slightly larger?
Brittany
Wednesday 14th of August 2019
Hi thanks! Brilliant idea. I’m basically almost set up and ready to go, but I had a question about how you change your end with the noodle. Once that end has the adaptor on it, it doesn’t pass through the hole on the right side . It’s also pretty tough to pull apart the pipe from the adaptor . Any tips or advice?
Leap of Faith Crafting
Thursday 15th of August 2019
I actually don't have any problems pulling the pipe out. It takes a few times to get used to it but it goes in and out pretty easily! good luck!
Alyssa
Wednesday 29th of May 2019
Thanks for this! My dad and I successfully made a turner, but I had to make a few adjustments. For one, the gorilla glue did not hold the motor in the dowel rod. The motors I have have a small hole on the part that turns so I drilled a small hole through the pvc and dowel and put a small nail through it to hold it in place!
Leap of Faith Crafting
Monday 3rd of June 2019
You are right, it won't hold. It needs to fit super tight, the glue is just extra! That's a great idea to drill a hole and put a nail though, I never thought of that! Thanks for the idea!!